
You need at least WordPress version 6.5+ installed for this theme to work properly. It is strongly recommended to always use the latest stable version of WordPress to ensure optimal performance and security. Server requirements:
PHP - Version 8.1 or greater is required. For ultimate loading speeds and better memory management, we strictly recommend using PHP 8.2+.
MySQL - MySQL version 5.7 or greater (or MariaDB 10.3 or greater).
Since WordPress is constantly evolving, official deployment guidelines are updated regularly. You can always review the official WordPress installation guide here.
Below are essential resources for managing your WordPress site:
A WordPress theme is a collection of files that work together to determine the visual styling and core frontend functionality of your website. Installing Cortics is a straightforward process, and you can choose between two standard methods:
Method 1: Via WordPress Dashboard (Recommended)
Log into your WP Admin panel, navigate to Appearance > Themes > Add New > Upload Theme, choose the localized cortics.zip file from your computer, and click Install Now. Once the upload finishes, click Activate to launch the theme.
Method 2: Via FTP Client
If your server hosting has strict file upload limits, unzip the theme archive on your computer. Using your preferred FTP client, upload the extracted cortics folder directly into the /wp-content/themes/ directory on your server. After the transfer is complete, go to your WordPress dashboard, navigate to Appearance > Themes, and click Activate.
wp-content/themes/ directory holds individual subfolders for each theme. If you encounter a "missing style.css stylesheet" error during upload, it means you are trying to upload the entire unzipped marketplace package instead of the standalone theme zip. Ensure you are uploading only the internal cortics.zip archive.
Once the theme is activated, a notification message will appear at the top of your WordPress dashboard prompting you to install the required and recommended plugins. To ensure your website functions exactly like the live demo, please install and activate these components.
| Plugin | Type | Description |
|---|---|---|
| Cortics Theme Pack | Required | Core functionality including custom post types, metaboxes, and custom theme widgets. |
| One Click Demo Import | Required | Allows you to import the demo content (posts, pages, images, and settings) with a single click. |
| Contact Form 7 | Recommended | Provides smooth, styling-integrated contact form support across your website. |
| Mailchimp for WP | Recommended | Handles newsletter subscription forms and seamlessly syncs with your Mailchimp lists. |
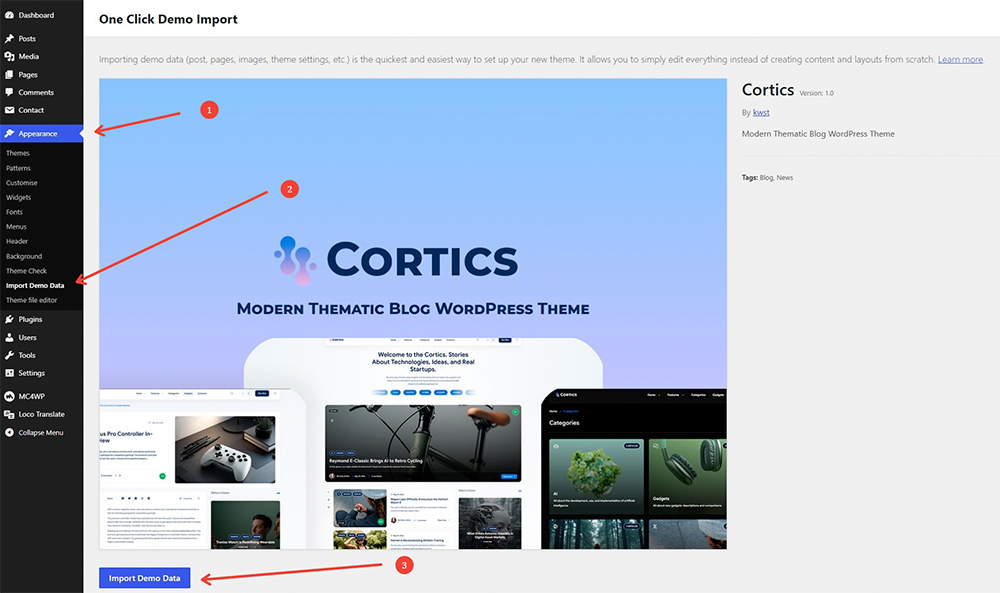
Importing demo data is the quickest and easiest way to set up your new theme. It allows you to automatically load pre-configured pages, stunning posts, dynamic layouts, and core theme customizer settings so your site matches the live preview instantly.
Cortics is fully integrated with the native WordPress Customizer, providing a seamless, real-time live preview editing experience for all global website elements. To configure your template settings, navigate to:
Appearance > Customize.
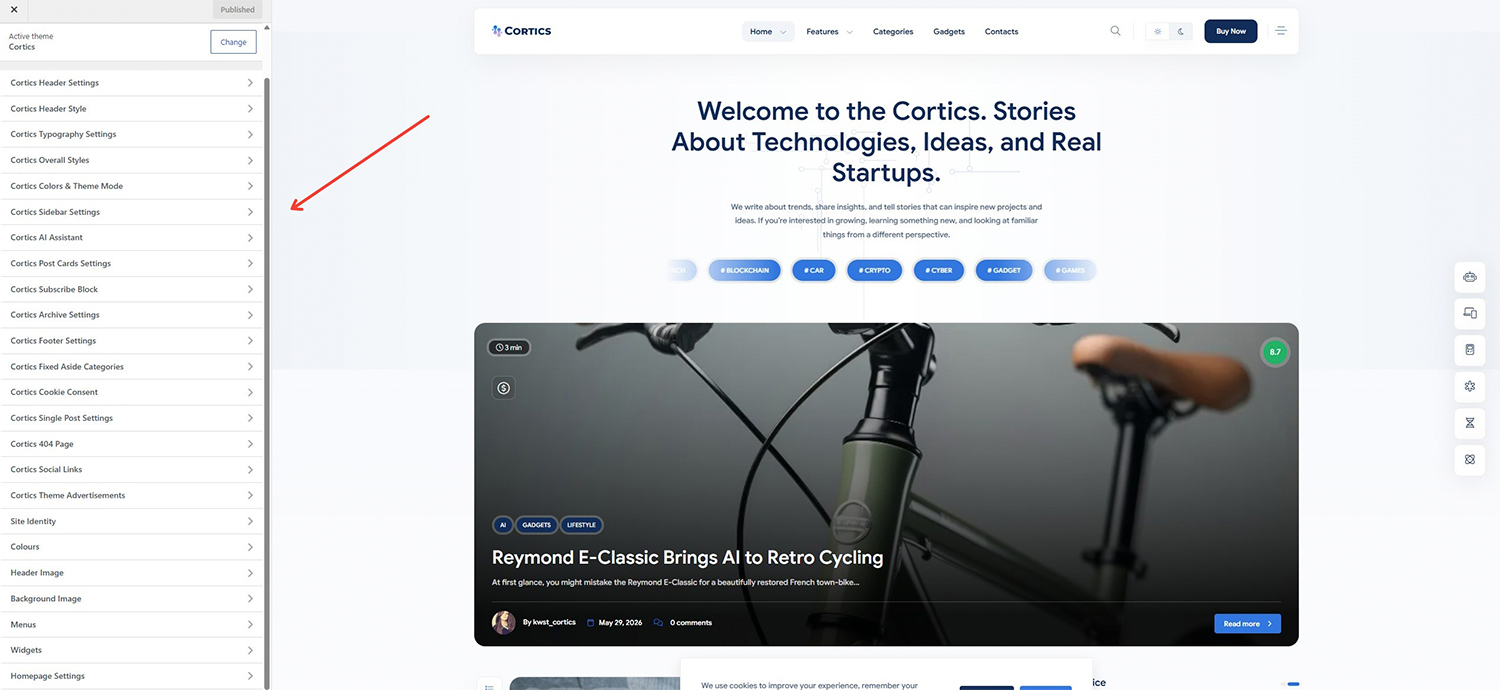
| Customizer Panel | Functional Description |
|---|---|
| Cortics Header Settings & Style | Global header configurations. Manage logo uploads (separate options for Dark/Light versions), header container height, sticky navigation behavior, and header layout variations. |
| Cortics Typography Settings | Manage font pairings for typography hierarchies. Choose from locally hosted, GDPR-compliant Google Fonts, and control specific font sizes and line heights. |
| Cortics Overall Styles | Global layout aesthetics, including border-radius settings for cards and content blocks, button design styles, general spacing properties (paddings), and structural layout accents. |
| Cortics Colors & Theme Mode | Manage site-wide color schemes. Control dark/light mode behavior, default theme mode preferences, and core branding accent colors. |
| Cortics Sidebar Settings | Register, create, and position sidebars globally. Options include left sidebar, right sidebar, or completely disabling sidebars for specific page types. |
| Cortics AI Assistant | Enable or fully disable the integrated artificial intelligence tools, toggle the floating assistant widget visibility, and securely save your personal OpenAI API key. |
| Cortics Post Cards Settings | Customize the appearance of post loops and entry cards. Toggle metadata visibility (author, date, comments count), estimated reading time indicators, and post rating badges. |
| Cortics Subscribe Block | Configure the global newsletter subscription sections. Edit call-to-action text headers, assign background images, and paste your newsletter form shortcode (e.g., from MC4WP). |
| Cortics Archive Settings | Global layouts for category indexes, tag archives, and search results screens. Select post grid columns and configure infinite scroll or standard pagination options. |
| Cortics Footer Settings | Footer area configuration. Adjust widget column counts, edit copyright text strings, manage bottom footer navigation menus, social links, and custom background colors. |
| Cortics Fixed Aside Categories | Settings and controls for the sticky sticky-aside category panel, designed for fast and intuitive user navigation through key blog topics. |
| Cortics Cookie Consent | Built-in cookie privacy notification banner. Customize notice message copy, assign Privacy Policy page links, and style the approval confirmation buttons. |
| Cortics Single Post Settings | Fine-tune single article templates. Control author bio box visibility, related posts sections layout, social sharing modules, and core content block positioning. |
| Cortics 404 Page | Customize the 404 Error Page layout. Change the error headline, descriptive body copy, background graphics, and configure the primary "Back to Home" redirect button. |
| Cortics Social Links | Central hub to enter your brand profile URLs. Automatically populates social icon blocks across the header, footer, and custom author widgets. |
| Cortics Theme Advertisements | Global ad banner management system. Easily inject advertisement shortcodes, custom image links, or Google AdSense scripts into specific target zones inside posts and archive loops. |
| Widgets |
Manage all widgetized areas. In addition to standard WordPress widgets, this theme packs premium custom widgets built specifically for publishers:
|
| Site Identity, Menus, Homepage Settings, Additional CSS | Standard native WordPress core customization settings for site titles, main navigation structures, homepage routing, and custom CSS code overrides. |
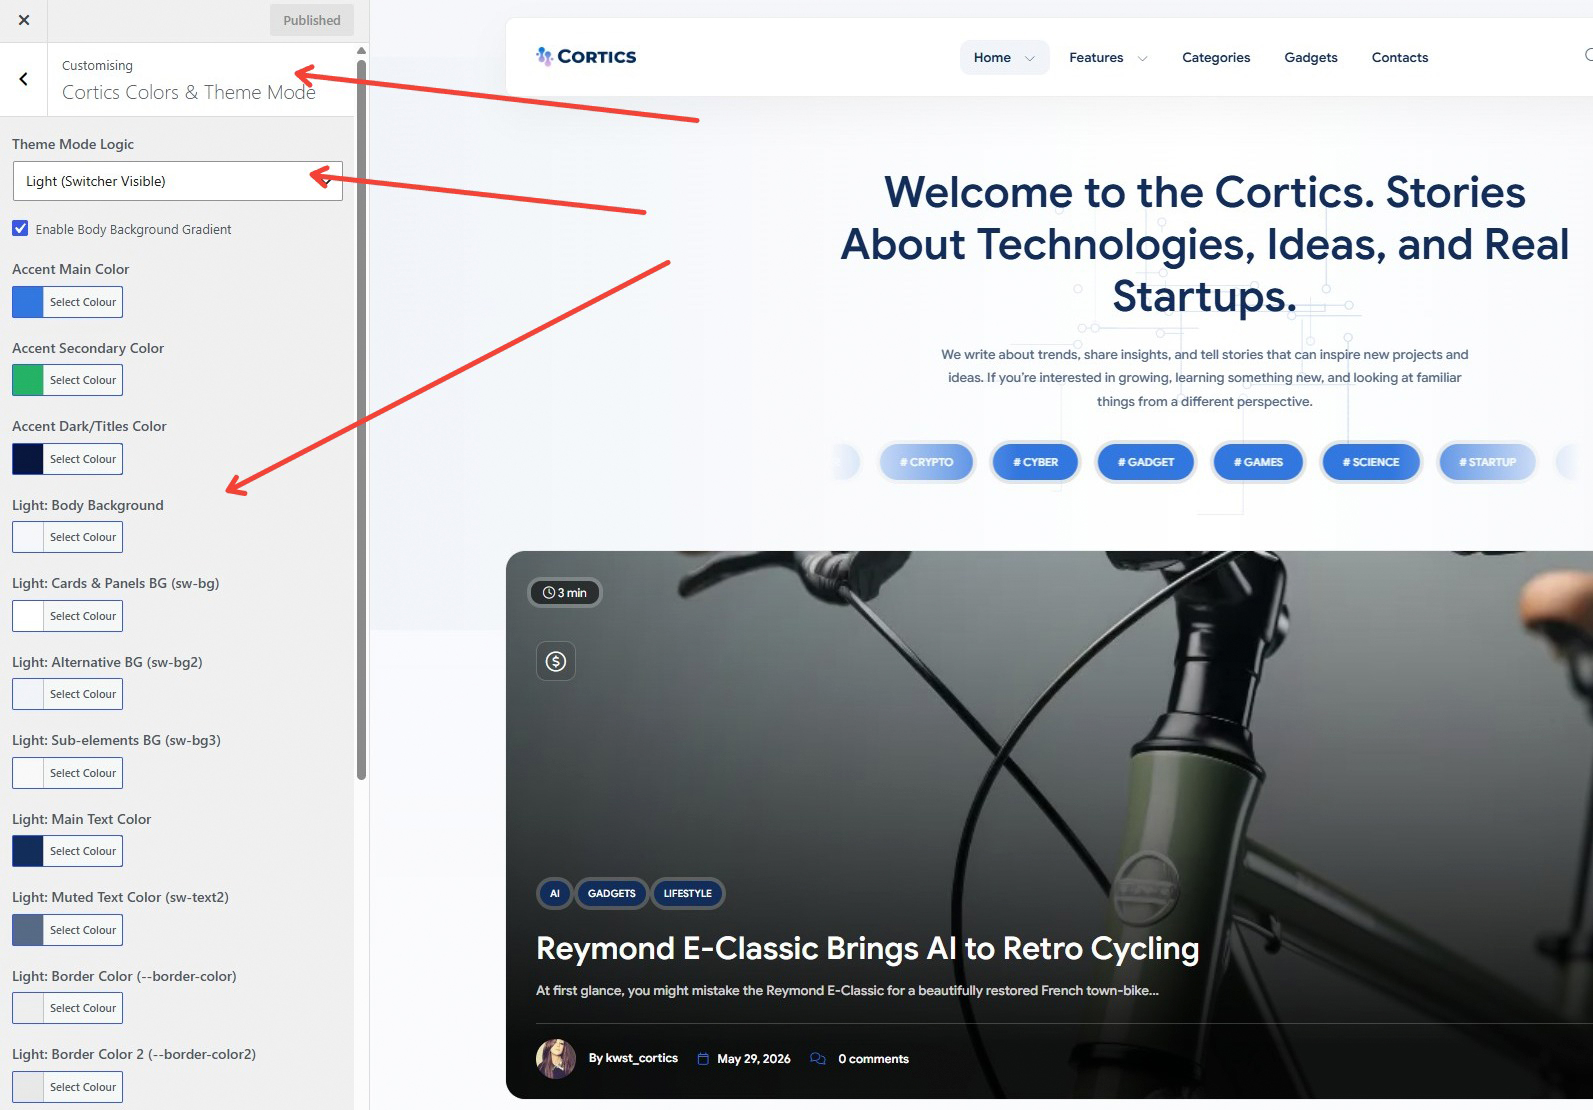
Cortics includes an advanced, native styling engine that supports complex global dark and light mode rendering. To modify your color choices, navigate to your WordPress dashboard and open Appearance > Customize > Cortics Colors & Theme Mode.
Using the Theme Mode Logic configuration dropdown menu, you can alter the frontend layout behavior to follow one of four unique delivery setups:
Beneath the core layout mode selection logic, you have complete independent color customizer pickers to assign branding colors across color schemes. You can explicitly map custom backgrounds, primary accent variables, title typography values, side elements, container card block sheets, and thin border separations separately for both the Light Profile and the Dark Profile modes.
Cortics includes a highly optimized, built-in layout engine that allows you to configure complex homepages and dedicated archives directly from the native WordPress page editor—completely avoiding heavy, speed-reducing page builders. To start, navigate to Pages > Add New, enter a title, and assign your target template via the Page Layout dropdown on the right side.
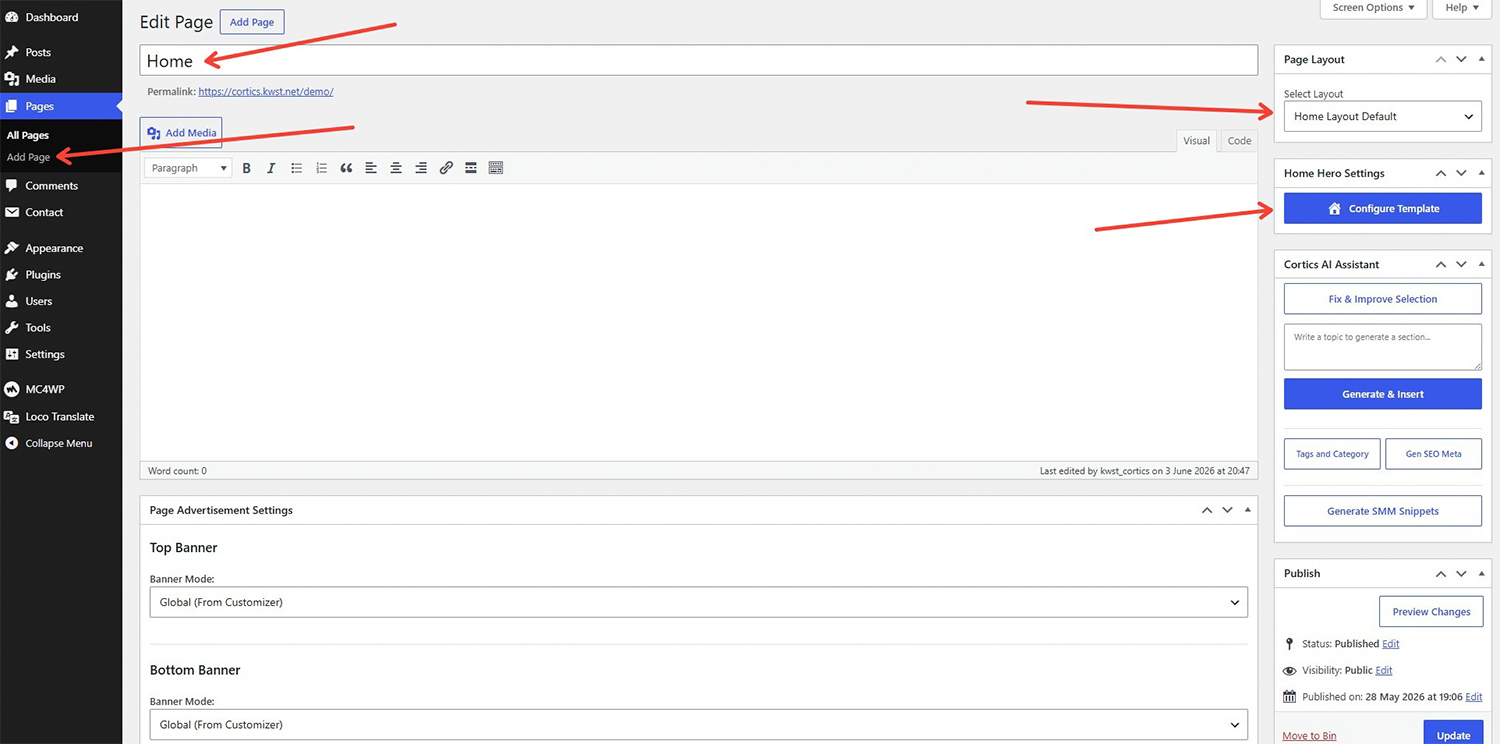
When choosing one of the flagship **Home Layout** profiles, an interactive button labeled Configure Template will activate on your dashboard screen. Clicking this button triggers a comprehensive overlay panel packed with styling parameters:
| Configuration Tab / Field | Functional Purpose & Dynamic Layout Behavior |
|---|---|
| Hero Section | Toggle visibility, adjust typography alignment alignments (Center/Left), write custom headings or taglines, and toggle modern Marquee Tag loops. You can also enable a premium canvas Background Line Animation. |
| Posts Settings | Define the strict post limit per page loop and dictate the initial view mode structure: *User Switch choices* (List, Grid, Classic setups) or *Fixed profiles* which lock the frontend and prevent user toggling. |
| Featured Post Options | Highlight prominent articles using diverse layout aesthetics: Standard Image, Carousel Slider, complex Hero + Aside grids, or Single Featured rows. Includes an optional live Category filter. |
| Bottom Posts Section | Inject an extra content loop layout block beneath your primary feed. Perfect for showcasing popular trending columns or isolating a targeted post loop category with custom outbound text navigation strings. |
| Bottom Categories Grid | Build a custom graphical category index matrix. You can explicitly customize the category limit count, control grid gaps, adjust card element heights, and assign specific card border-radius parameters dynamically. |
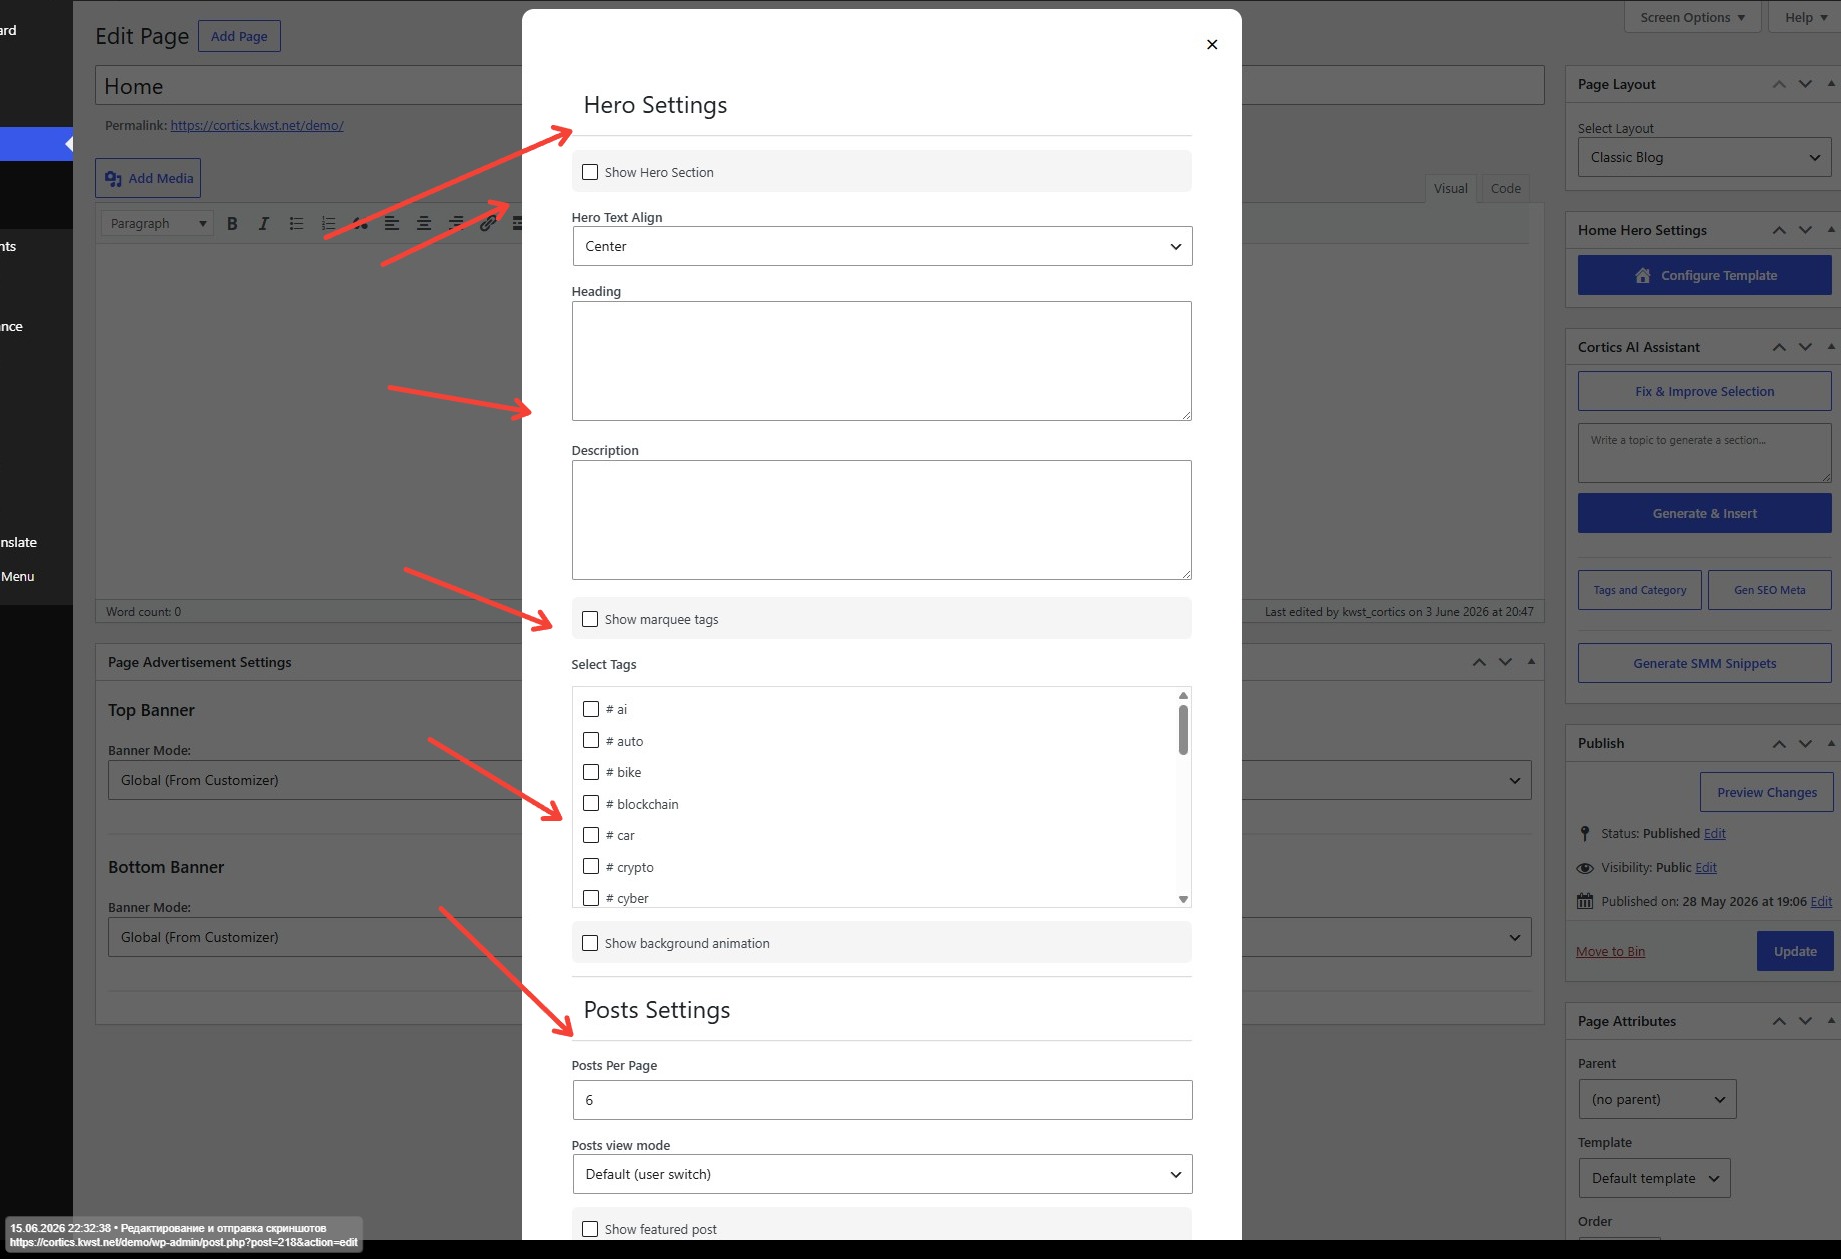
By combining and experimenting with these modular parameters across the three template architectures, you can construct an infinite number of highly unique layouts without writing a single line of code.
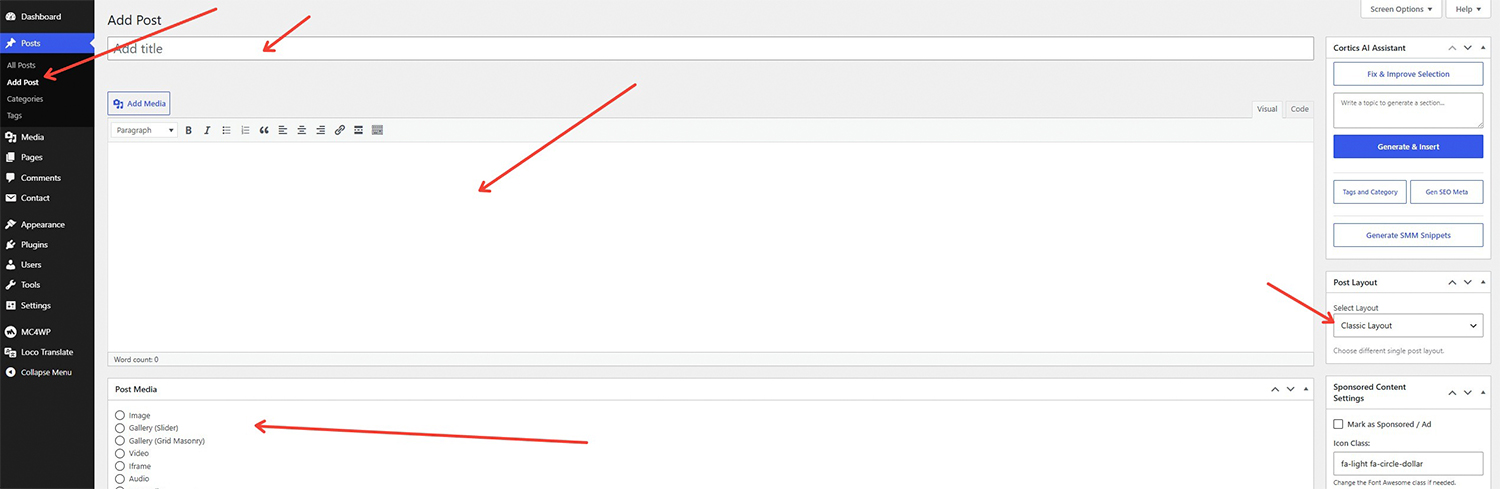
Cortics offers an incredibly flexible interface for individual articles. To create content, navigate to Posts > Add New. You can compose articles manually, leverage the integrated AI Assistant, choose distinct media types, and map dedicated layout styles.
Using the Post Layout meta box on the right side of your editor panel, you can instantly change the structural presentation of your article:
The Post Media manager panel at the bottom of the canvas controls what displays at the top of your post view:
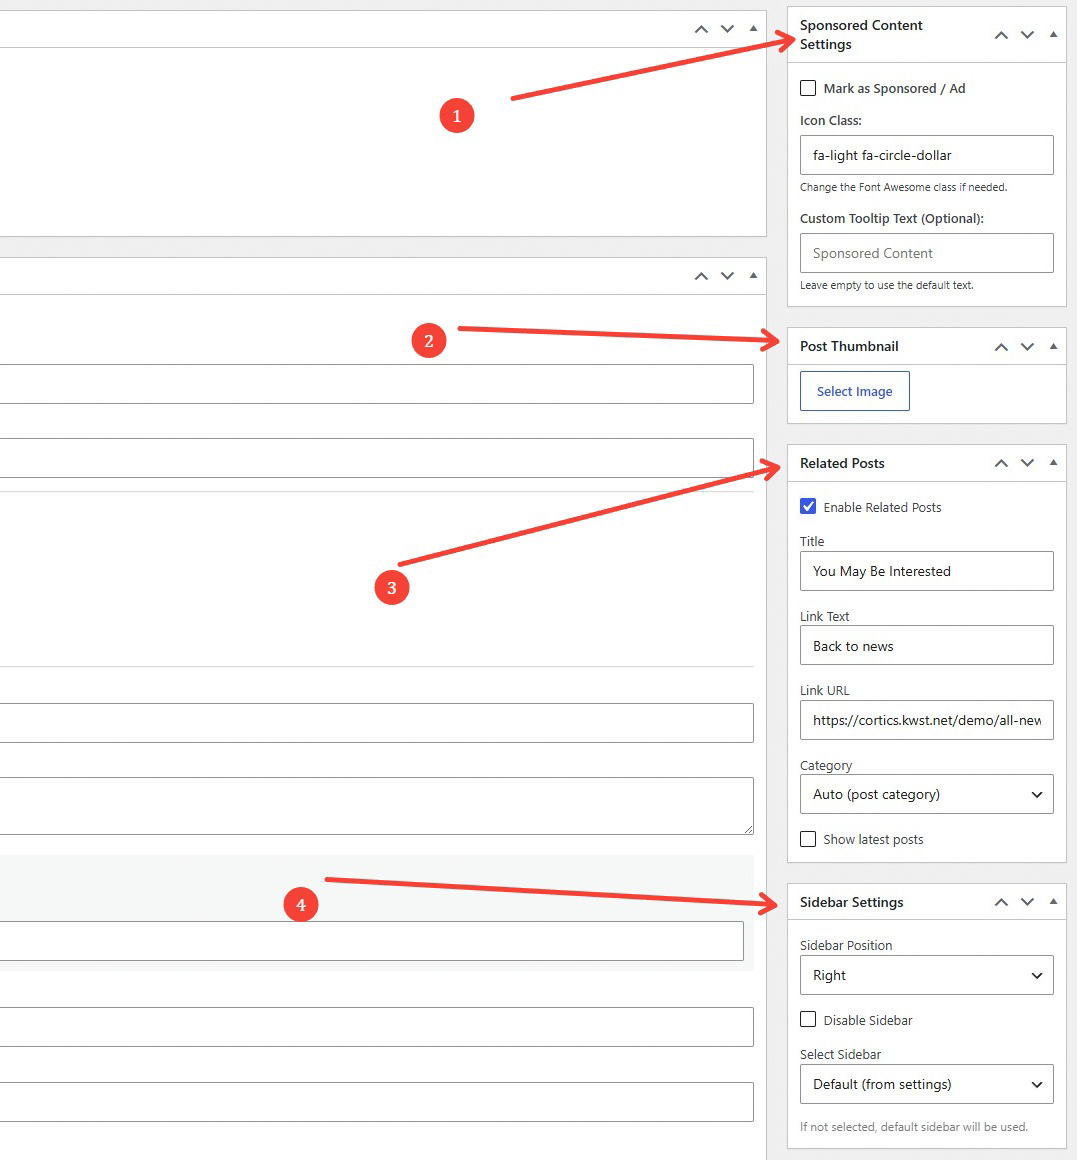
Scroll down below your main editor workspace to adjust specialized metadata settings configured exclusively for this template:
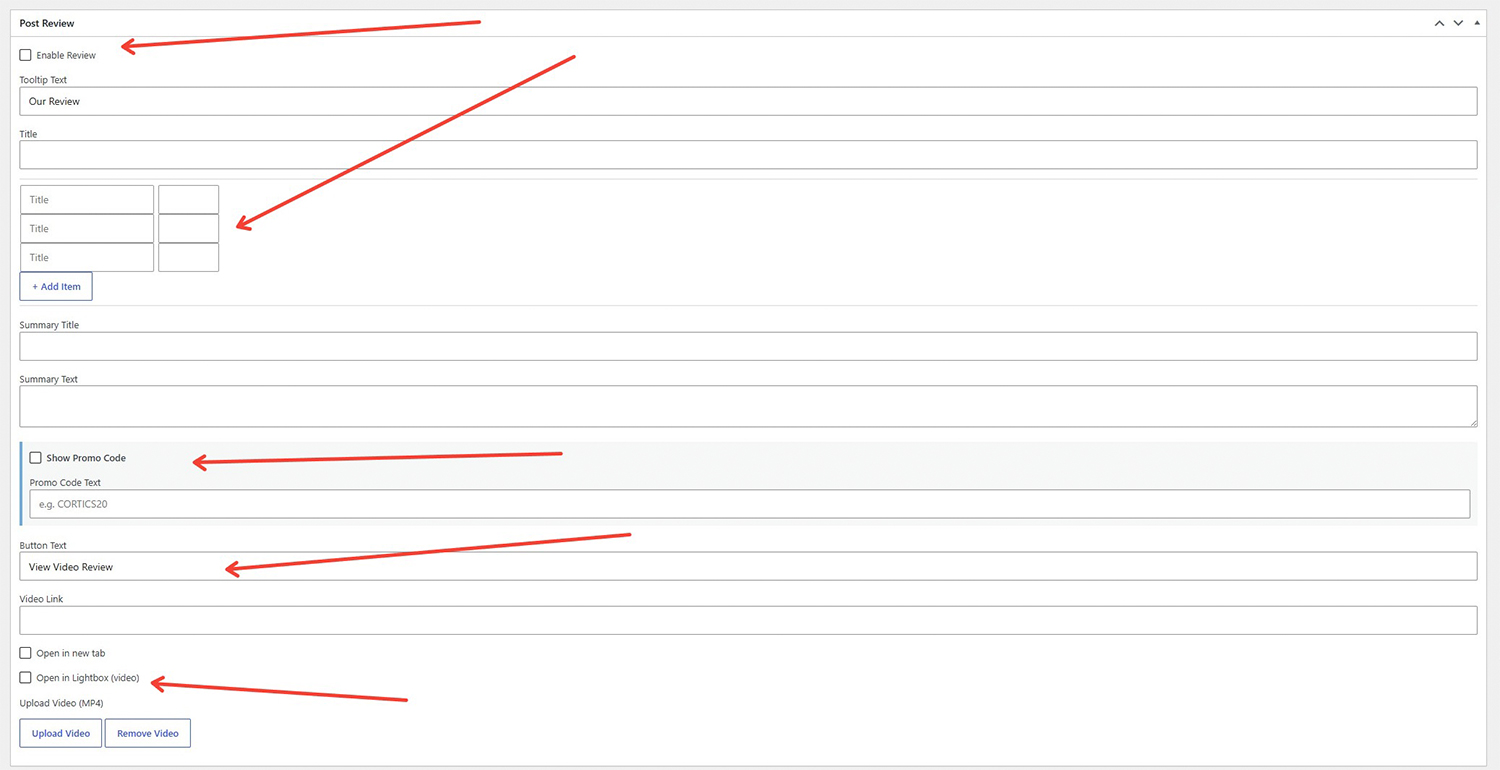
Cortics features a native, light review score engine. This lets you write professional critique metrics without installing heavy third-party plugins:
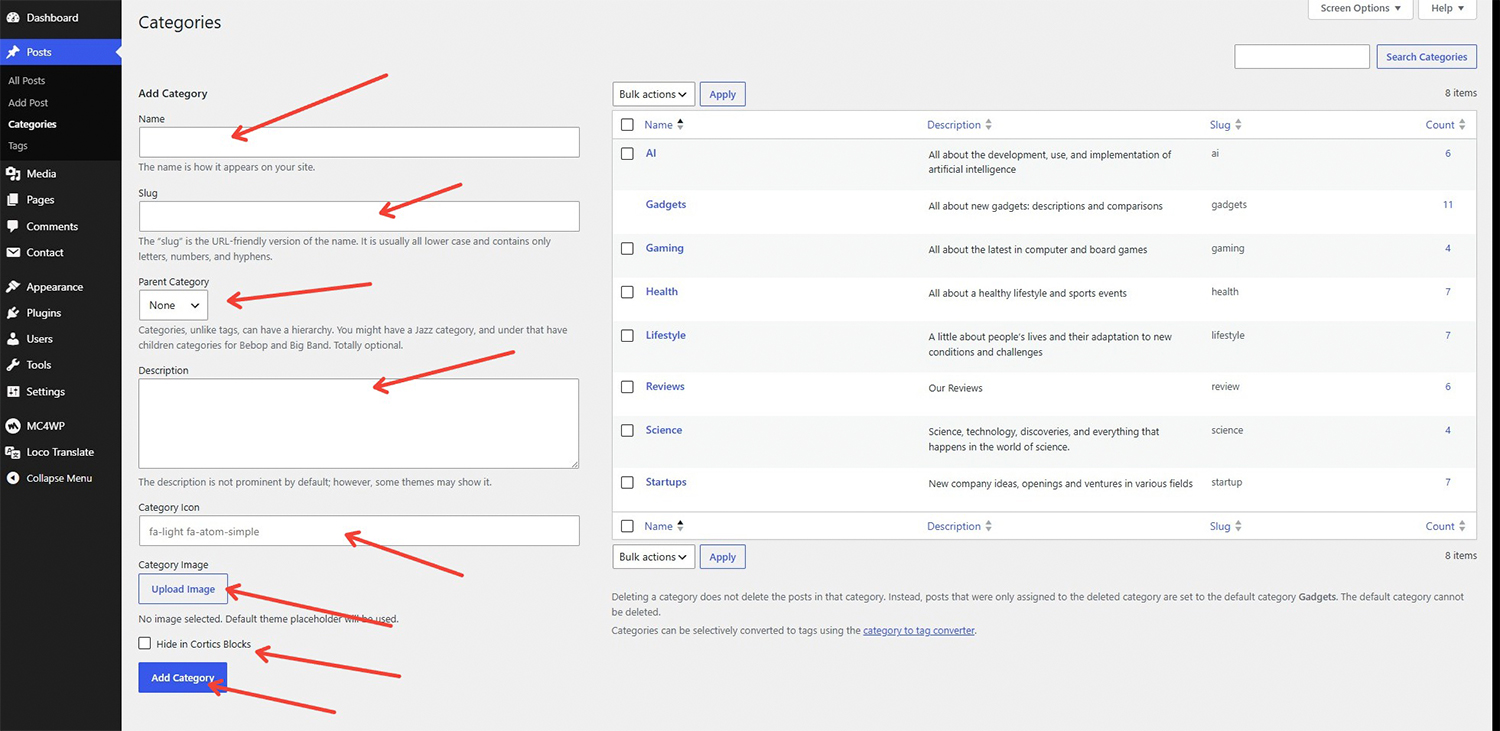
Cortics extends the native WordPress category taxonomy system by adding premium custom meta fields. To manage your taxonomies, navigate to your admin dashboard and open Posts > Categories.
While fields like Name, Slug, Parent Category, and Description follow standard WordPress core functionality, the theme introduces specialized attributes to enhance frontend layouts:
fa-light fa-atom-simple) to give your category a unique visual brand asset. This icon will render inside post cards, category listings, and navigation highlights.At the bottom of the taxonomy management screen, you will find a custom checkbox option labeled Hide in Cortics Blocks.
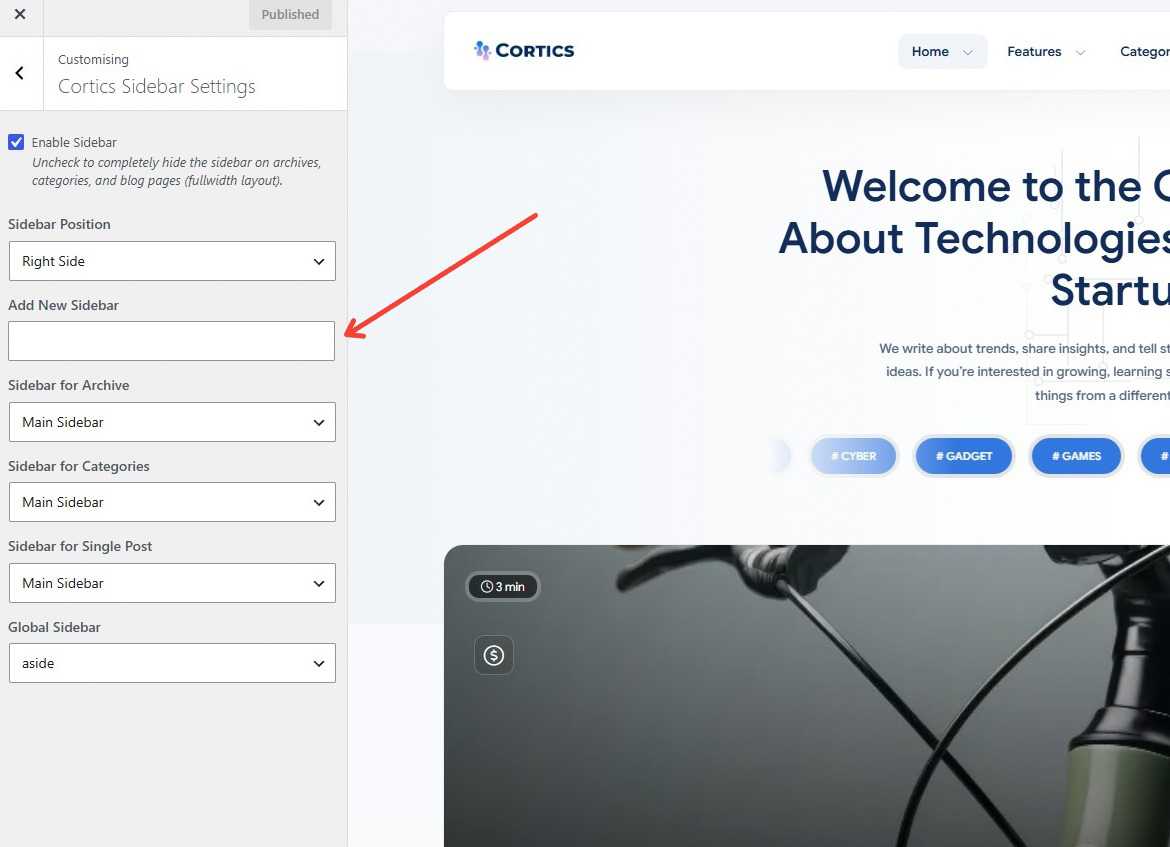
Cortics features a highly flexible dynamic sidebar management ecosystem. Beyond standard theme zones, you can create unique custom sidebars directly from the admin interface and map them to specific pages, single posts, or entire category groups.
Navigate to Appearance > Customize > Cortics Sidebar Settings. Use the Add New Sidebar field to type a unique name for your custom container, then click Publish. You can also configure global visibility preferences and default layout alignments (Left Side, Right Side, or Fullwidth Layout) directly inside this panel.
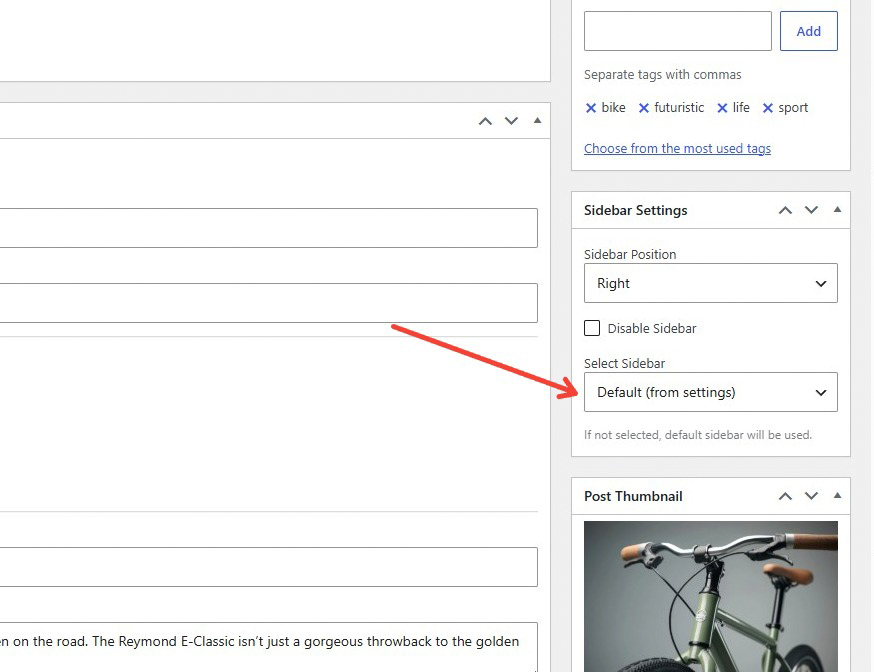
Open the edit screen of any post or page where you wish to override the default layout. Look at the right sidebar navigation options panel under the Sidebar Settings meta box. Here you can toggle overall sidebar visibility, adjust the structural alignment properties for this asset, or assign your newly registered option via the Select Sidebar dropdown menu.
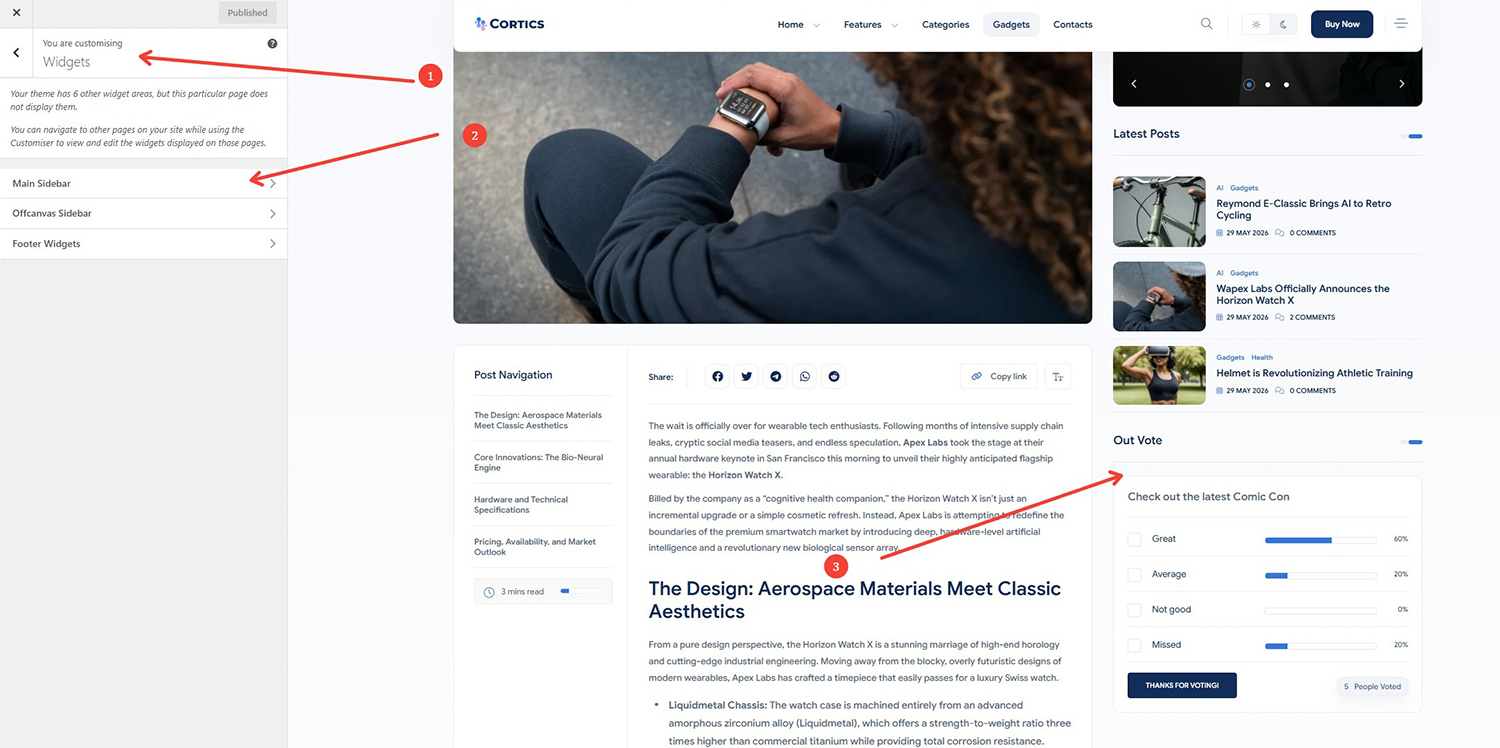
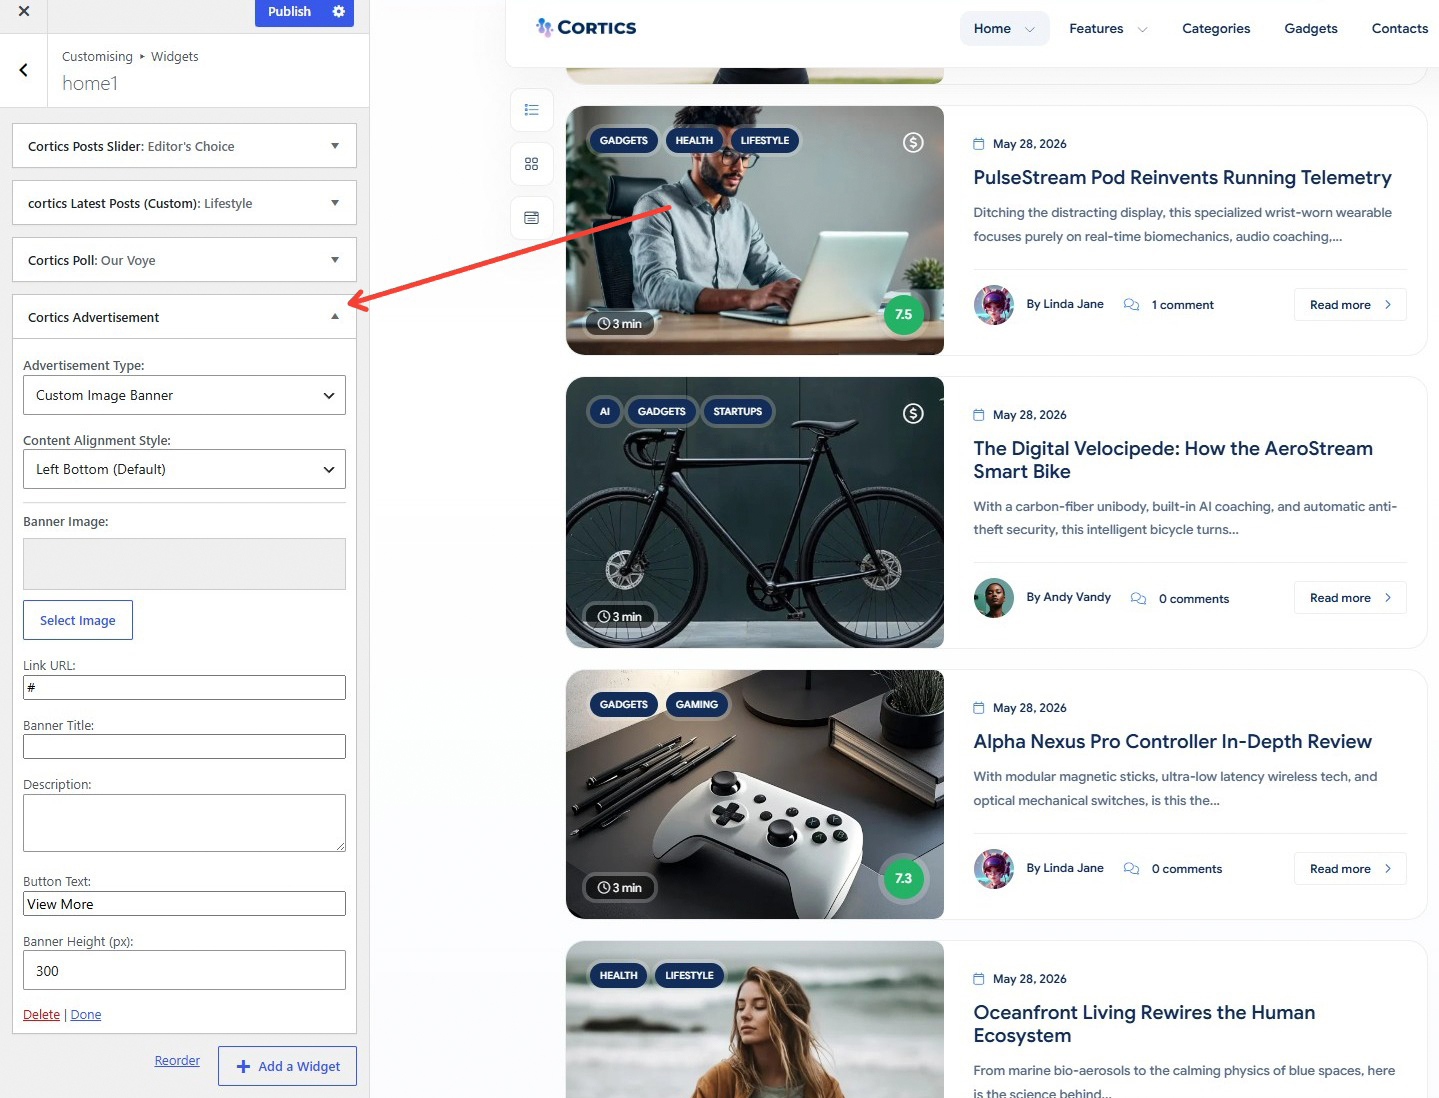
To fill your newly created template zone, view the assigned page on your frontend while logged into WordPress and open the Customizer > Widgets panel. Select the newly added target container block stack, and freely append premium tools like interactive voting polls, cryptocurrency price grids, or custom layout banners.
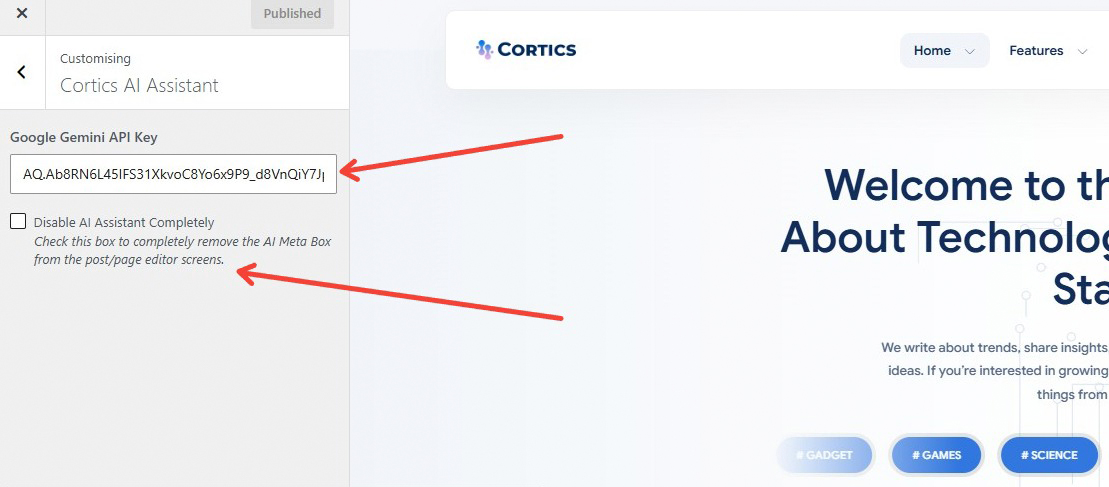
Cortics comes equipped with a powerful, native content-generation assistant powered by the Google Gemini API framework. This integrates an advanced content meta box directly into your post and page editing screens, allowing you to streamline your content creation workflow.
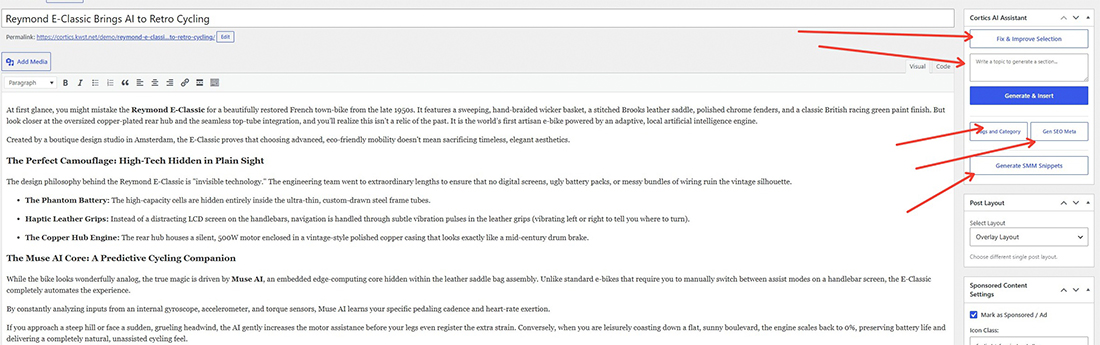
Once configured, open any post or page editor. The dedicated Cortics AI Assistant sidebar element will be active and ready to process commands:
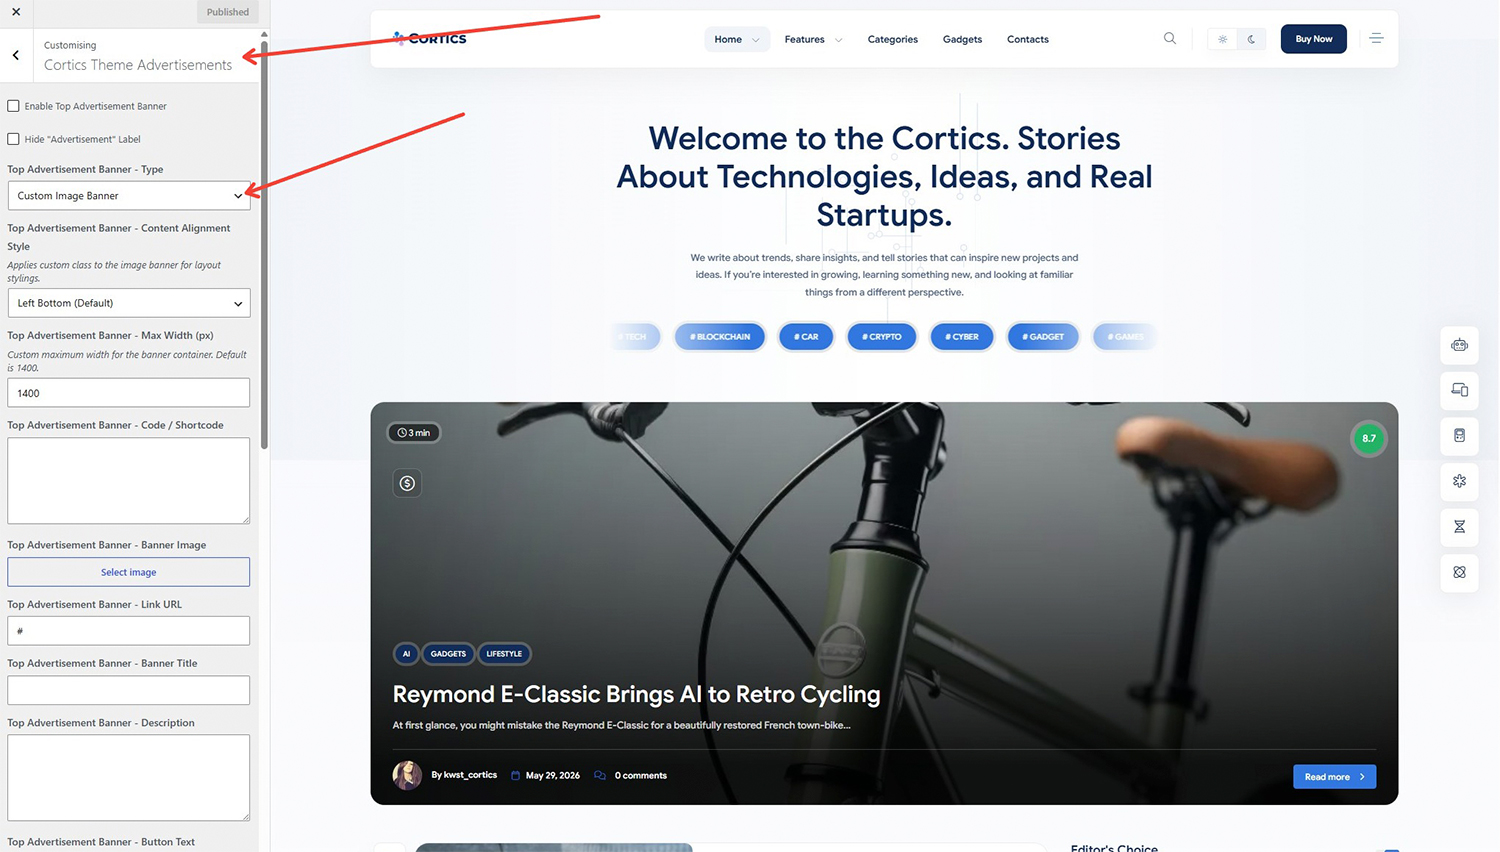
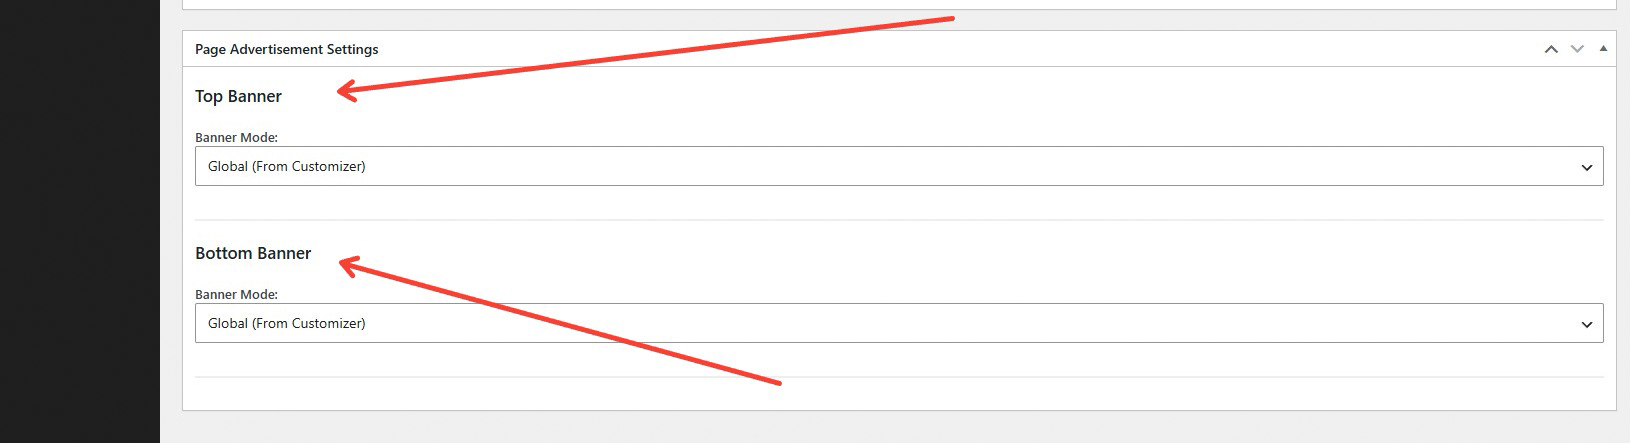
Cortics features a highly flexible, multi-level advertisement injection engine. This native system allows site administrators to easily monetize content through comprehensive global placements, modular widget areas, or granular post-by-post overrides—completely eliminating the need for bulky third-party banner rotation plugins.
Every single ad slot within the theme is natively built to process and render multiple deployment methods:
The monetization pipeline is split into three highly intuitive hierarchy levels:
Cortics includes a fast, native AJAX-powered search engine that opens inside a clean modal window directly on the frontend.
To manage or modify your search settings, navigate to Appearance > Customize > Cortics Header Settings. From there, you can choose how the search bar functions:
The theme seamlessly integrates custom styling for the Contact Form 7 plugin. To replicate the beautiful multi-column forms displayed in the live demo, follow these steps:
[submit "Submit"]
Click Save. Once saved, copy the generated shortcode (e.g., [contact-form-7 id="4fb2535" title="Contact form 1"]) to embed it into your Contact Page layout or Theme Customizer options. You can also customize system notifications and alert text templates within the Messages tab.
To enable the inline newsletter capture forms featured across the blog layout:
[mc4wp_form], or by selecting the dedicated Mailchimp Sign-up Form widget inside your standard sidebar or footer widget areas.
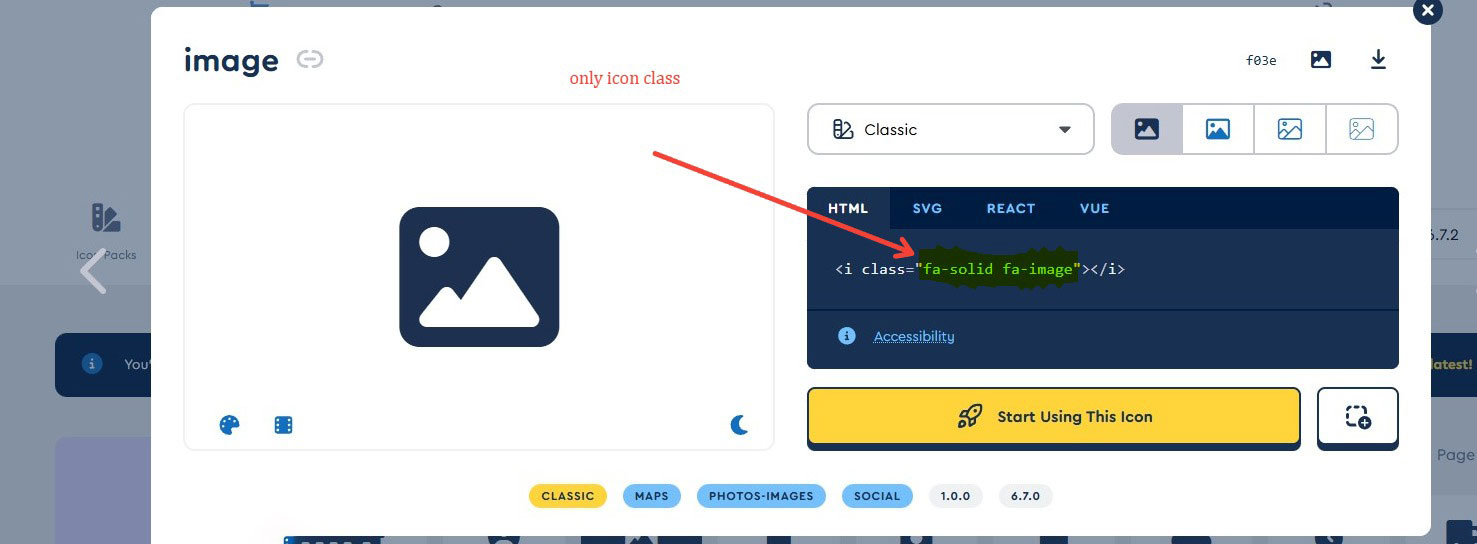
Cortics utilizes the premium Font Awesome v6 library for all vector iconography across the template. To browse the complete catalog of available symbols, visit the official index: https://fontawesome.com/v6/search.
<i class="..."></i> embed string.
Correct Input Example:
fa-solid fa-image
By default, WordPress handles system URLs using a non-SEO-friendly query structure, such as https://example.com/?p=123. For a professional blog like Cortics, it is highly critical to enable Pretty Permalinks. Clean, keyword-rich URLs significantly improve your Search Engine Optimization (SEO) and provide a much better user experience for your readers.
?p=123 (Default fallback, not recommended)./2026/06/14/sample-post//2026/06/sample-post//sample-post/ (Strictly Recommended)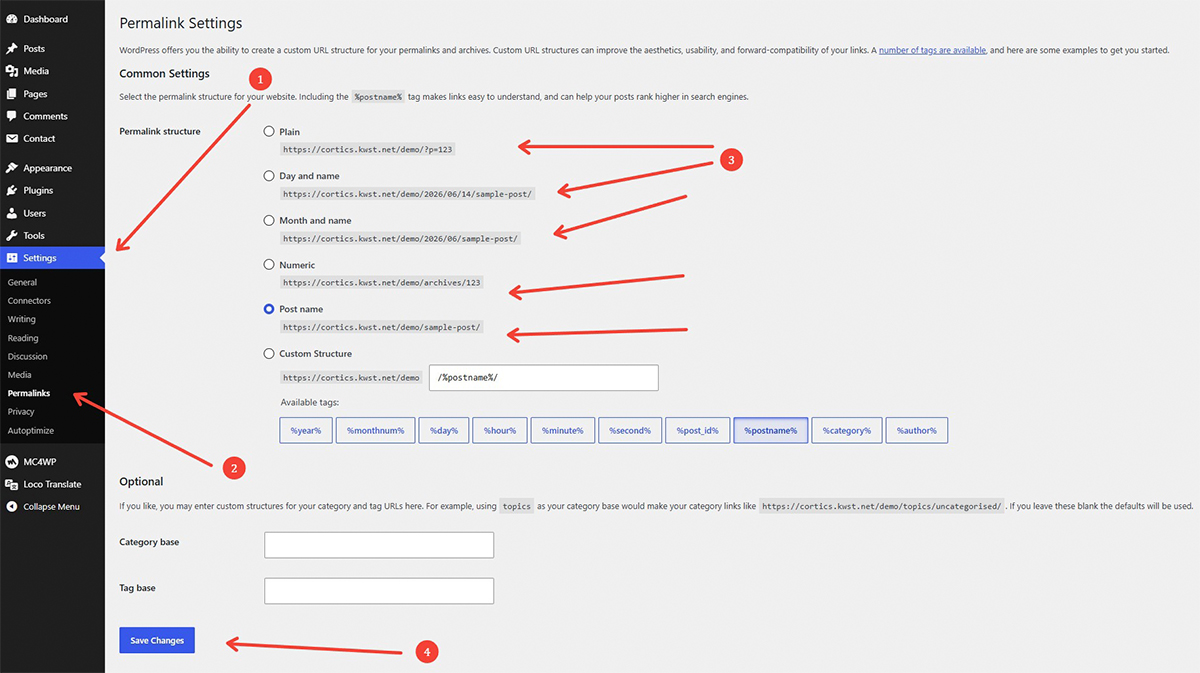
Cortics is fully translation-ready and conforms strictly to standard WordPress internationalization methods. All hardcoded interface strings are properly wrapped in localization hooks, allowing you to easily translate the theme into any language using Loco Translate (plugin) or Poedit (desktop software).
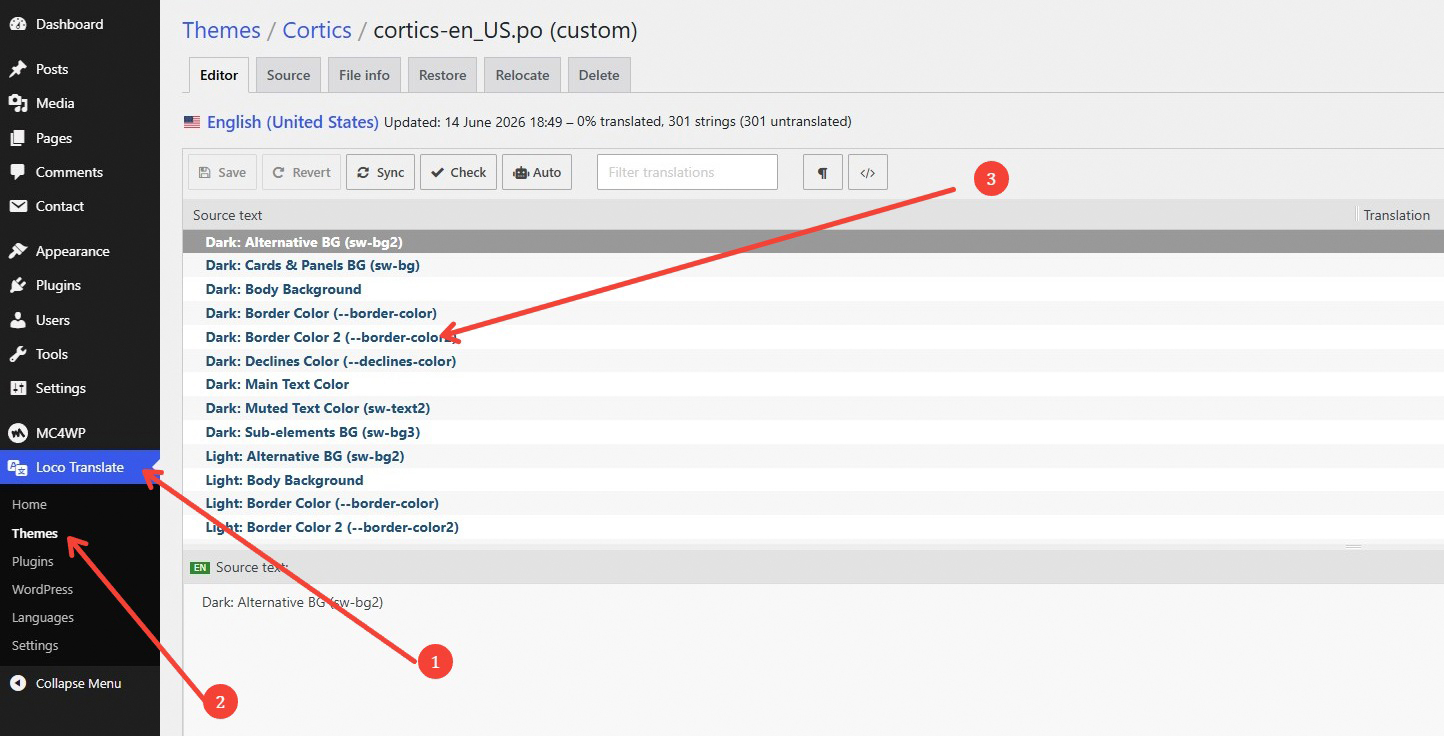
Some admin settings, widgets, and custom blocks are powered by the companion plugin. To translate these specific strings, simply follow the exact same procedure by navigating to:
Loco Translate > Plugins > Cortics Theme Pack (Text Domain: cortics-theme-pack).
If you plan to modify or extend the core template functionality, alter styles, or register custom actions, it is heavily critical to use the companion Cortics Child theme instead of editing the parent files directly.
style.css file.functions.php file.Fonts Used
Google Fonts —
(Note: All font assets are embedded locally within the theme package to guarantee GDPR compliance and maximum PageSpeed scores without external server requests).
Images Used in Live Preview
Magnific
Pexels
Lummi
Important: All images are used for demonstration and preview purposes only. They are not included in the final theme download package.
Plugins & Third-Party Scripts
All other third-party scripts, open-source libraries, and assets utilized within this template are the property of their respective owners and are integrated under standard open-source licenses.